


At the end of Part 1, we parked the GT Four in my garage. Well, pushed it into the garage, since the car doesn’t run.
I managed to hunt down a used door for the GT Four, and will be picking that up in a few weeks. I’m still on the hunt for a reasonably priced right-front widebody guard to replace the existing one. While I still need that guard, replacing the door means I can (hopefully) take the car for a Warrant of Fitness, so it would be legal to drive. Pretty keen on this as it means I can use the GT Four while still hunting for the guard, and doing other work on it that’s needed.
Project Car: 1993 Toyota Celica GT Four | Fuel Pump Diagnosis
But to get a WoF, the car needs to be mobile. My focus for the moment will be to get the car running. You might remember from Part 1 that the fuel pump is likely faulty or dead and to get to it, I’d need to remove the tank. The info on the pump came from the previous owner, who had already removed the pump once and got it running, and then it died again.
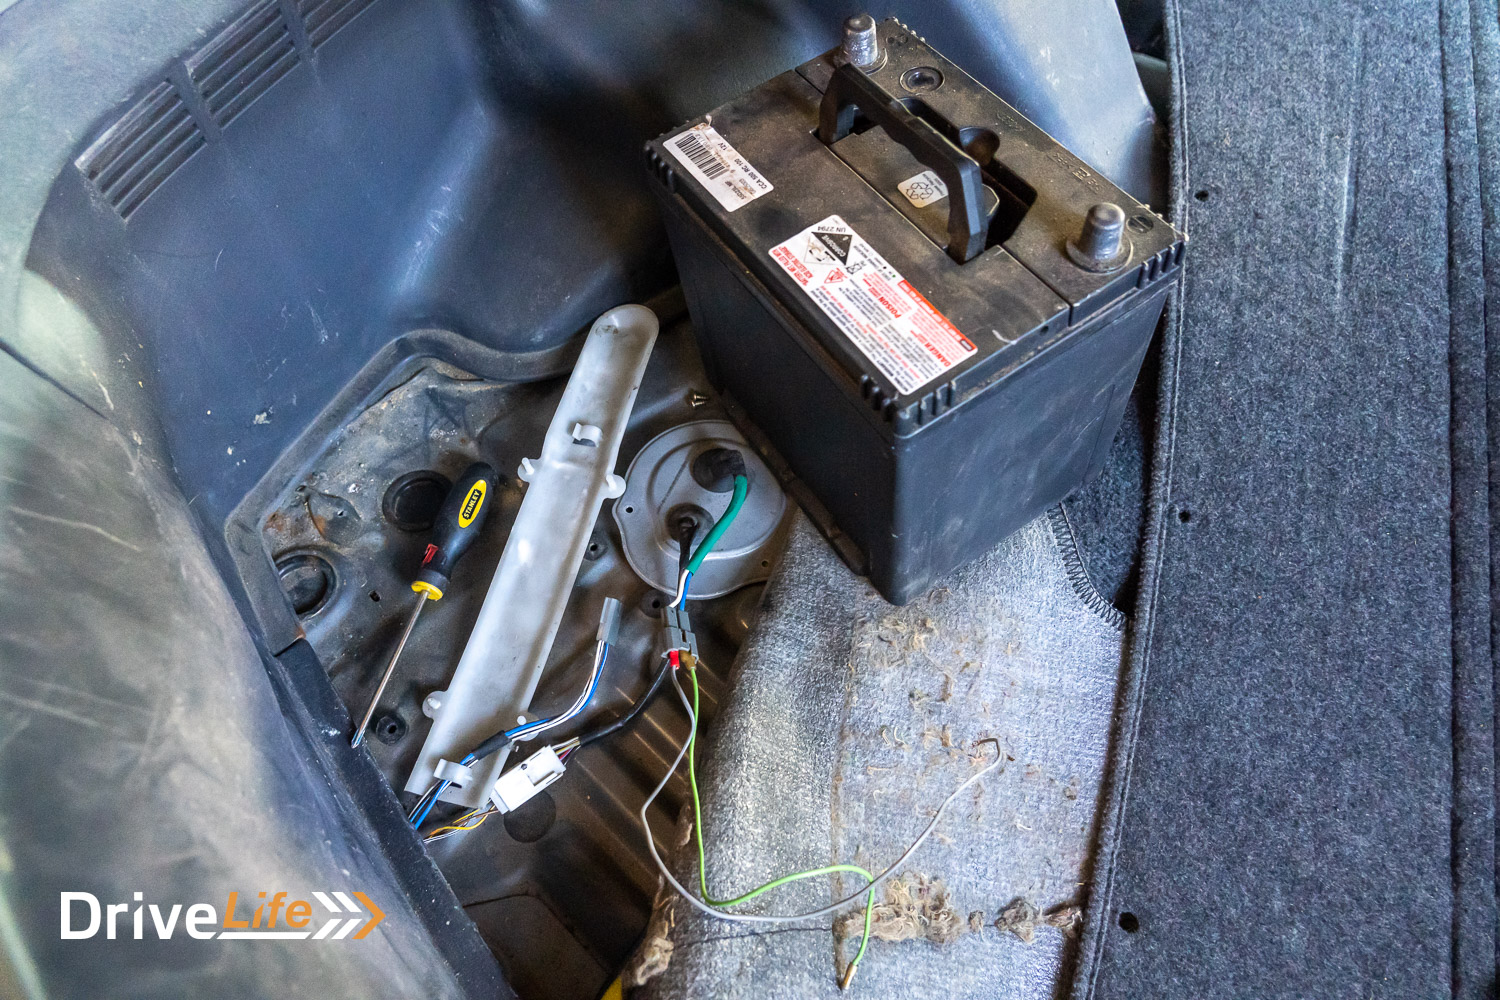
Before pulling the tank out, I decided to hook up a 12-volt battery to it to be 100% certain the pump is actually dead. While the tank has to be taken out to remove the in-tank pump, the power to it is under the carpet in the boot, so pretty accessible. I pulled the connector apart and hooked up my battery – and the pump worked.
I wasn’t sure if this is a good or bad thing. On the plus side, it’s likely I don’t have to pull the pump out or buy a new one. It seems to work just fine, for a short period at least. But if the pump isn’t the issue, then what is it? Tracing a fault could take days. Regardless, I hunted down all the fuses that the fuel system uses, and they were fine.
There is a resistor pack for the fuel pump under the battery tray and while it looks ok physically, they are known to give problems. At this time, that’s number one on my hit list. The fuel pump relay is on the other side of the car in the engine bay, it looks almost new but could be faulty.
I pulled up the wiring diagram for the car. It looks like while the car is starting, the ignition gives 12 volts to the fuel pump and then once it’s running, power supply switches over to come from the ECU. There’s a diagnostic plug under the bonnet and I read if I jumpered ports Fp and B+, it would bypass the ECU and fuel pump relay entirely and would make the pump run regardless of key position (starting or not). I grabbed a piece of wire and jumpered the connections, and turned the key to ignition on – and the pump started. Being brave, I pushed the key around to the start position, and the engine started and idled.
Feeling pretty damn good now – it runs! – but still got the issue of finding out where the problem is. I went back to my wiring diagram and found that it could either be the fuel pump relay, the Open Circuit Relay (OCR), or any of the wiring joining these together, or on the way to the fuel pump. I hunted down the supposed location of the OCR, in the passenger footwell next to the ECU. The ECU was already hanging out on the floor, having been reconditioned by the previous owner, but I couldn’t see the OCR anywhere. I did find a plug that looked lost, so went back to my box of spare parts that came with the car and found a small relay with the words, “Open Circuit Relay” on it.
You can see what’s coming next…I plugged it in where I thought it should go, removed my diagnostic jumper and turned the key, the engine started and sat on a nice, even idle.
Well, that was it – the GT Four is running. That’s not to say the fuel pump isn’t going to die on me 100 metres down the road, but not having the OCR in place and the fuel pump not working seemed like I had found the (free) solution to the car’s main mechanical issue.
Project Car: 1993 Toyota Celica GT Four | Bodywork Check
Now I can drive the car out of the garage instead of pushing it, time to clean it up. You’ve seen from the photos in Part 1 that the car is covered in bird crap. This is never good for paint – bird droppings are acidic and over time will eat into the paint, and the droppings have been on the car for a long time.
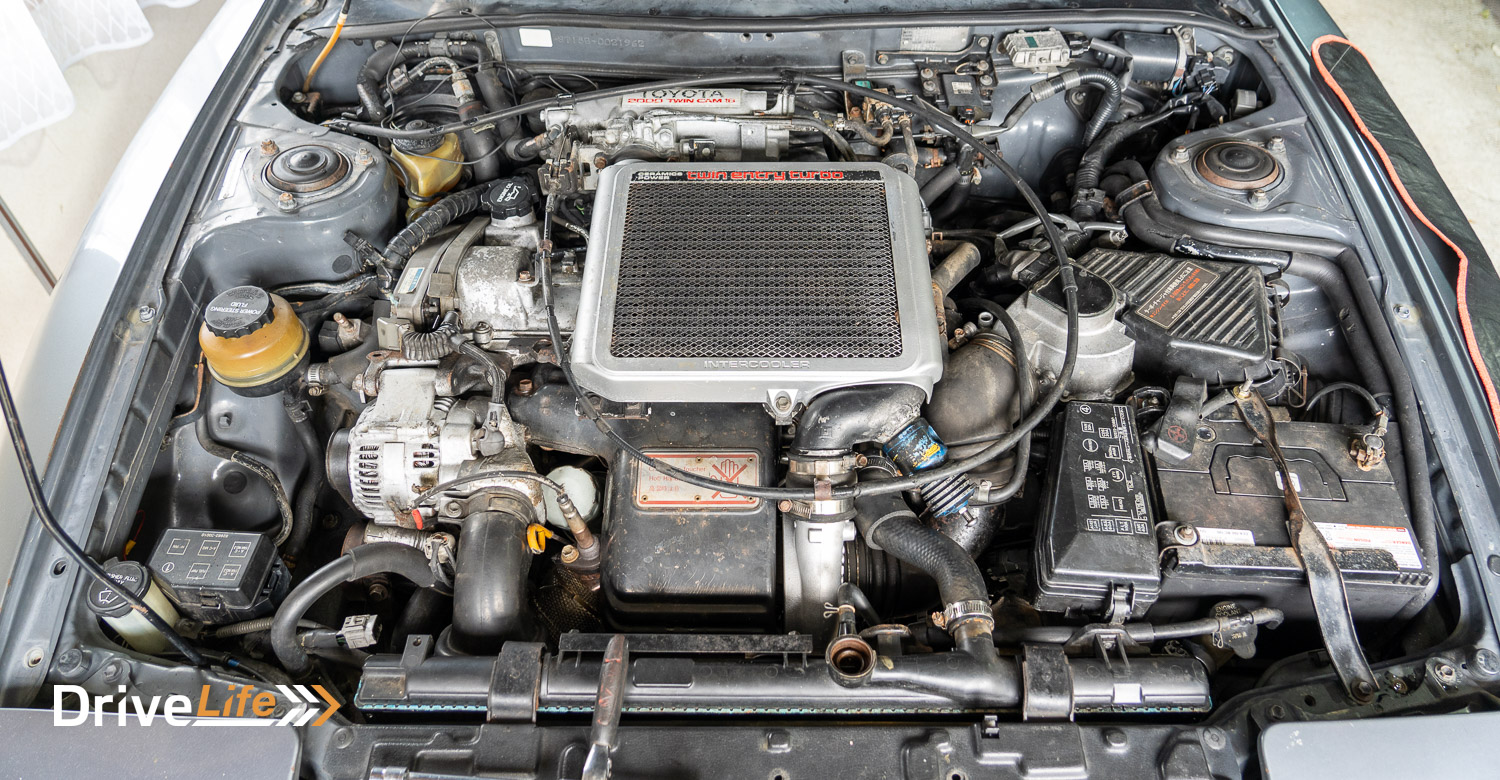
But first, I took to the engine bay with degreaser and a light waterblast. It’s pretty grubby under there, with lots of dust and residual oil and grease from 30 years of use. I can see lots of electrical plugs just hanging out and not plugged into anything. I’m not sure if they are supposed to be, so will need to check each one.
One thing staring me in the face is that aftermarket air cleaner. It’s sucking up hot air from the engine bay, so I’ll be replacing that with the factory air cleaner box that the car came with. Another obvious issue is that rats have chewed quite a bit of rubber off parts in the engine bay. Nothing that I think will stop the car from running reliably, but it looks terrible. The rubber insulation along the aircon pipes is particularly bad, and I’m not sure how I’m going to fix that.
Initial engine clean done, it was time for its first wash in who knows how long. As suspected, the bird poo came off relatively easily but left marks over the car. The marks aren’t the worst thing; in some places on the paint, the poo had started to eat into the paint, either removing the paint or in some places, starting to rust. Only tiny specks of rust, but still rust. Thoughts of my panel beater suggesting the car needs a complete respray come rushing back to me. We’ll cross that bridge another day.
The car was washed and bird poo removed, I then took to it with a clay bar. I love clay bars, you can feel the smoothness in the paint after using one, all the contaminants removed. From ten feet, the paint looks pretty good. There is still the driver’s door and guard to sort out but overall, it’s driver quality.
First the first time in daylight, I checked out the interior more thoroughly. The carpets are filthy, the seats are mostly good except for the sponge coming out on the driver’s seat. The headlining needs replacing and the steering wheel is faded badly. All things I’ll need to start hunting for to bring this car back to its glory.
Project Car: 1993 Toyota Celica GT Four | Engine Bay Tidy
Another weekend and it was time to make a start on the engine bay. I want to get it back to as close as original as I can, as long as it’s financially feasible. First up was removing the aftermarket air filter pod and returning the car back to the factory air box. Thankfully all the bolts for this are with the air cleaner, so other than having very little room to work with, not a big job. If there’s one thing I’ll discover from working under the bonnet of the GT Four, it’s that there’s very little room for hands anywhere.
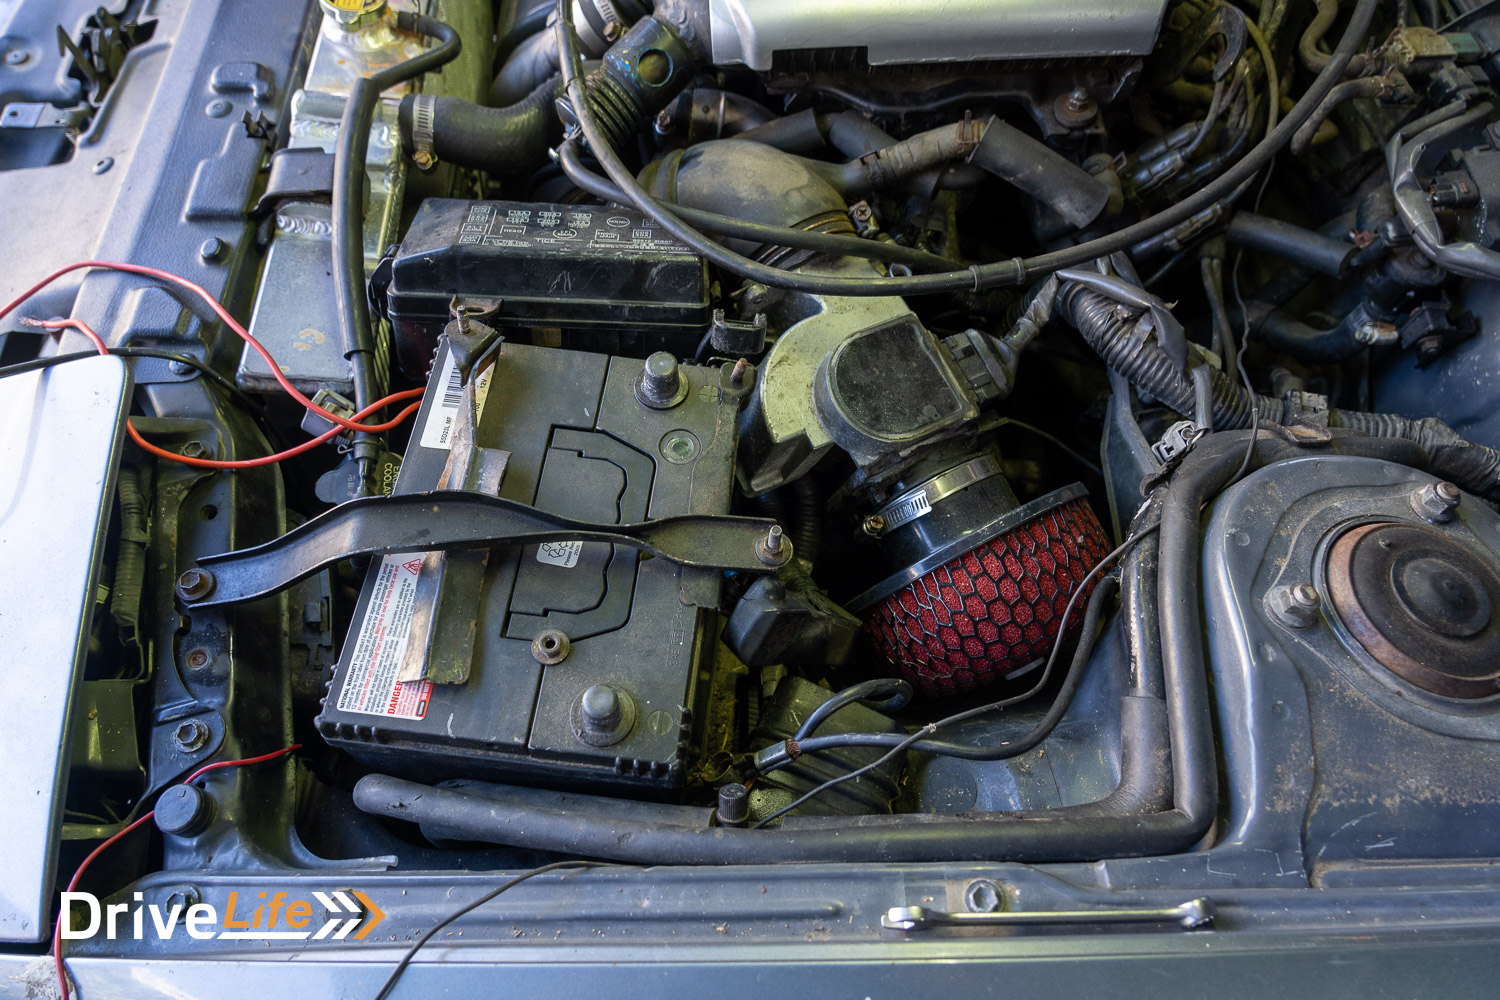
I notice that the plastic air tube running from under the headlight and into the airbox has a big hole in it, where rats have decided to make it a little condo of their own. I’ll source another one of those and replace it. With a new air cleaner element in place, that’s the air filter box done.
Next, it’s on to the alternator. The cables that should go between the alternator and the cambelt are instead going right over the top of the alternator, and it looks terrible. Yep, it doesn’t affect the running of the car, but the OCD in me wants this right. As I’m fixing this, I’m starting to see bolts missing, more electrical plugs hanging out, and other things just not right. It makes me wonder what else I’m going to find.
After the alternator wiring is sorted, I removed the heat shield from the turbo, as I could see an inlet manifold bolt missing. Once the heat shield is off, I can also see two bolts missing from the manifold that bolts to the turbo. That’s not good. I can’t find any among the spares that came with the car, so will need to source some of those.
Next, it’s on to the battery clamp. It looks like the wrong clamp, as someone has beaten the edges of it badly with a hammer so the wider battery would fit. I can’t just replace it with an aftermarket one, as the engine-bay fuse box bolts to the clamp as well. On checking out some engine bay photos on the internet, it shows a much wider clamp to allow for the battery. I’ve managed to track one down and will replace the clamp.
On moving the GT Four around on the driveway, I can hear some clunking from the back end. It’s not bad, but it’s surely not good. I’m guessing that since there’s a new rear diff mount in the box of spare parts, that will need replacing.
It looks like the GT Four has an alternator cooling system, with an air duct that should feed up from under the car and into the alternator, and I’ve found the parts needed in the boot. But with an aftermarket (wider) alloy radiator in place, there’s no room for the air tube. That’s one strike against the alloy radiator. Strike two is the radiator’s cooling fan; it’s not connected, and I don’t know why. Since the car came with the original radiator – it looks pretty serviceable – I’ll drop that off to be pressure tested, and if it’s any good, will put that back in the car.
All GT Fours come with a strut tower brace, and I notice that’s sitting in the spare parts pile. The previous owner said he took it off to do work on the engine, and never got around to putting it back on. Five minutes later, it’s on, and the engine bay is starting to look so much more original. There’s still surface rust on many brackets and the like, but I can sandblast those another day and repaint them.
Project Car: 1993 Toyota Celica GT Four | Electrical Tidy
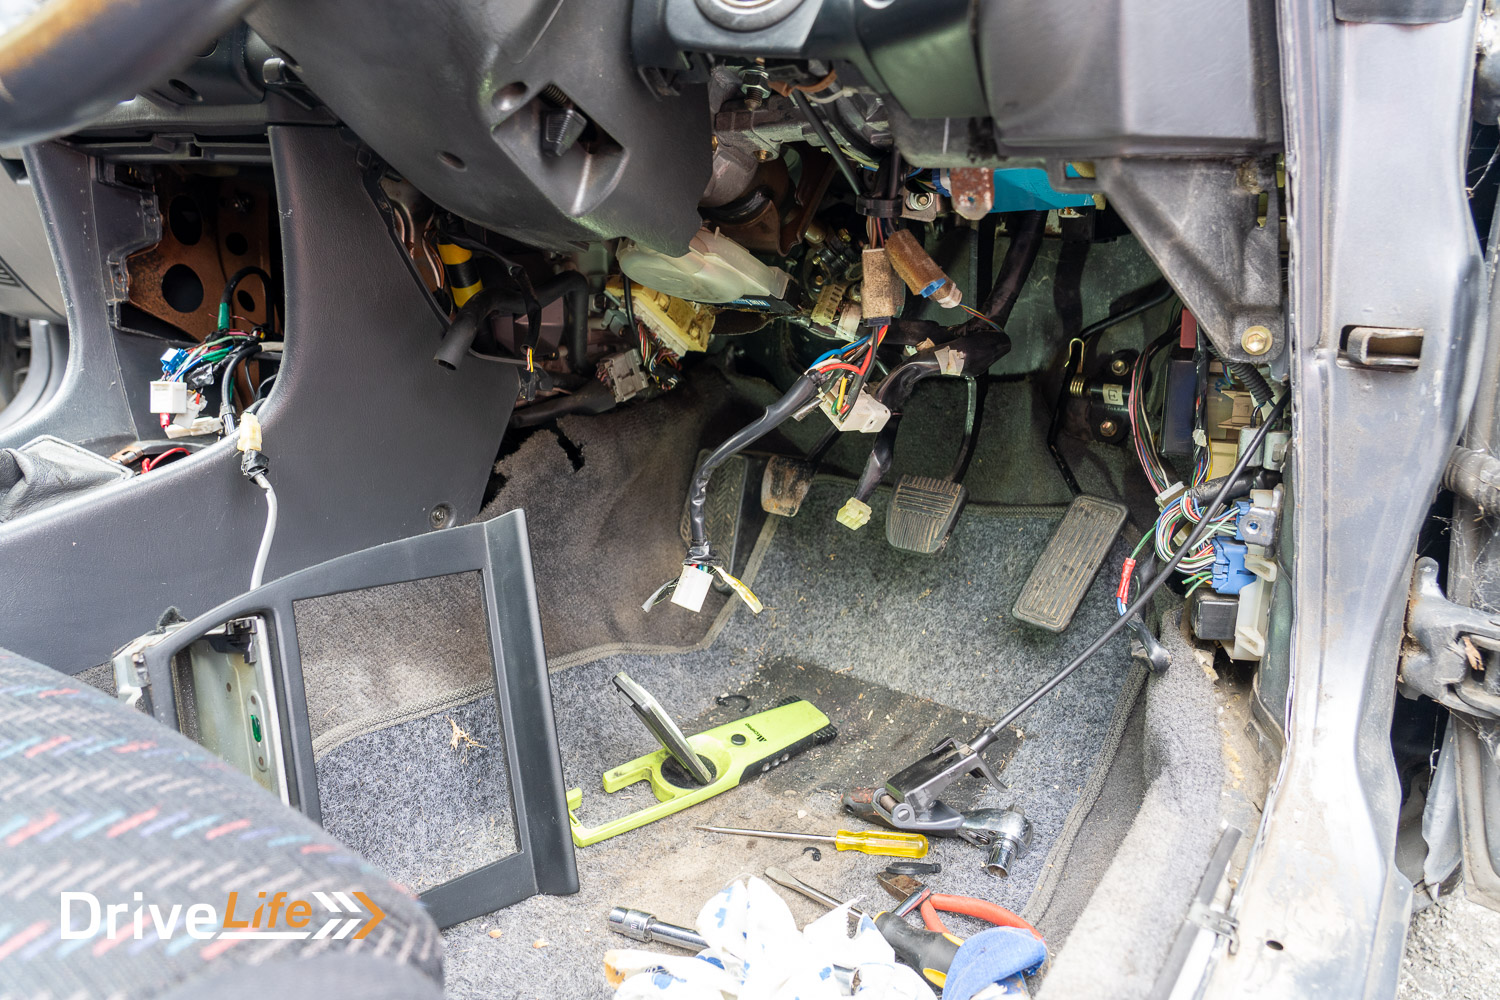
Another weekend, and it’s time to tackle some of the car’s wiring. While things electrical seem to be working ok on the whole, it’s a bit of a mess. The ECU is hanging out on the passenger’s floor, there’s a non-functioning turbo timer hanging down on the driver’s side, and other wires that don’t seem to do anything, including some coming through the firewall.
Doing electrical stuff like this is my happy place, as I like the end result; tidy wiring. Getting the ECU back in place meant looking on Youtube, as I couldn’t really tell how it was supposed to go back under the dash. This is one of the dangers of buying someone else’s project car that’s unfinished. You never know how things came out.
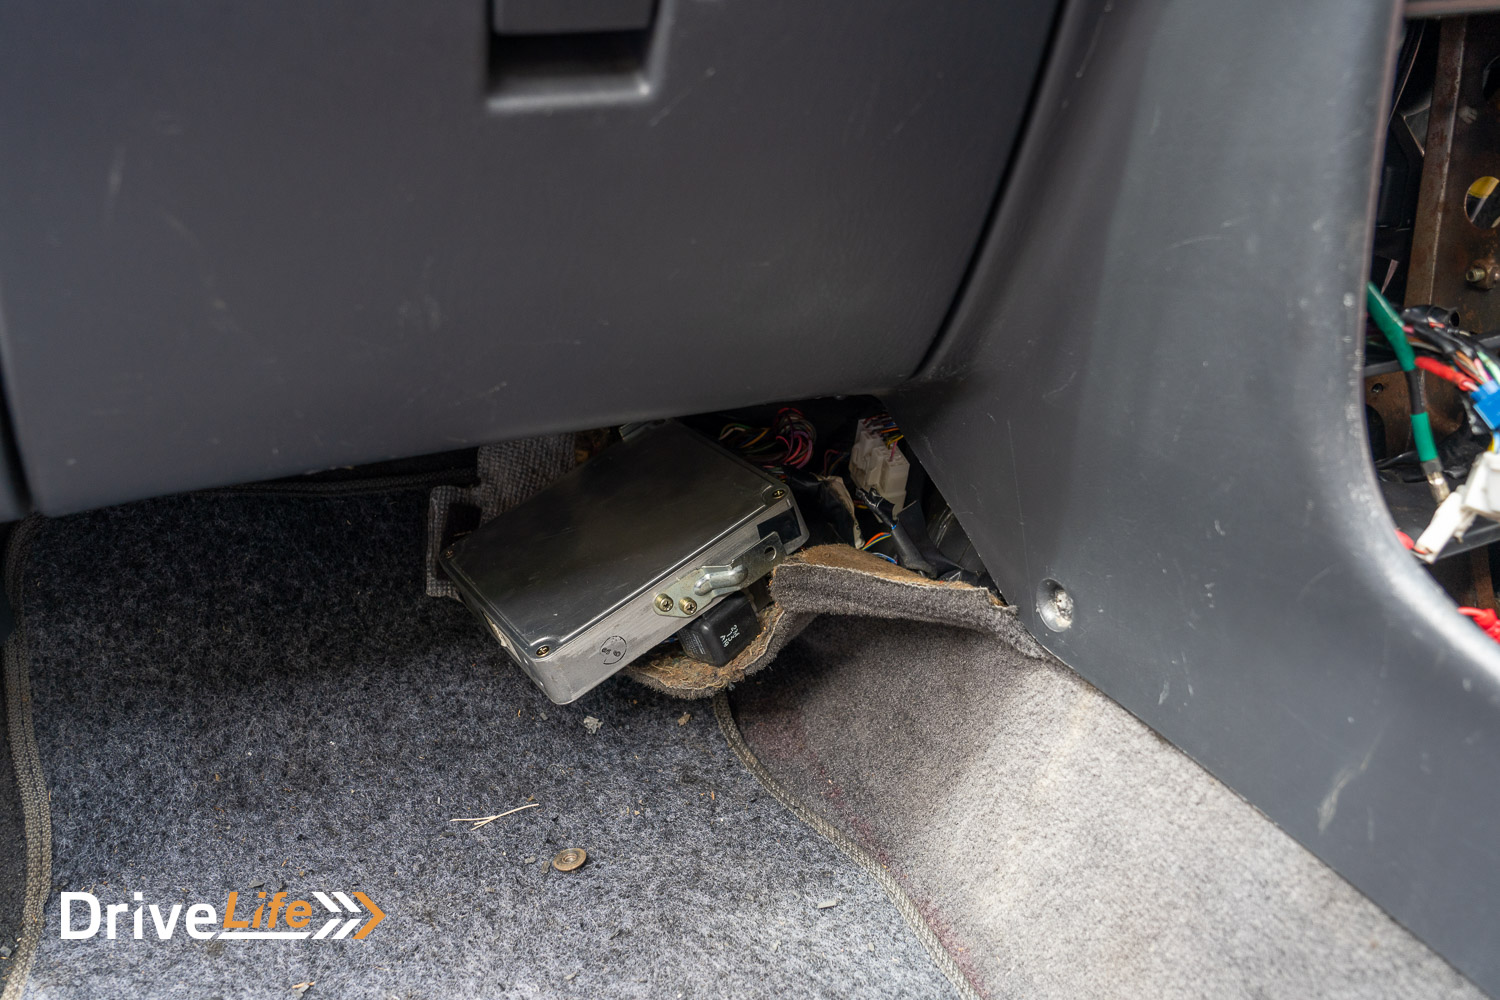
But I did get the ECU back in, even finding the exact right bolts to use. Straight away, the passenger’s side of the car looks so much cleaner.
Next, it’s pulling apart under the dash on the driver’s side. The turbo timer has been spliced into the wiring, so that’s a bit more involved in returning the car to its factory state. I can see some other wires on the kick panel that have been snipped, but looking at the wiring diagrams it looks like they are to do with the aftermarket door speakers, so I’m going to ignore that for now. My aim at the moment is to tidy things up and get the car ready for a WoF check.
I picked up the original radiator from Capital Radiators during the week. They pressure-tested it, found one small hole and plugged that, and she’s ready to go back in. Capital Radiators suggest that unless I was racing the car, they would certainly trust it to go in the car. It doesn’t take a lot to get the radiator into the car and the fan hooked up. Next was getting that alternator cooling system back in place. Again, since I didn’t pull it apart, it takes some figuring out what goes where and how.
That all done, I filled the radiator up and turned the ignition on. For some reason, the radiator fan is going all the time, so I’ll need to sort that out.
The day is nearly over, and I decide to vacuum the GT Four for the first time. It’s getting closer to going for its WoF check, so I think it’s due for a little birthday. Like the tidier wiring, the interior looks so much better when it’s clean. Still needs some love like a new steering wheel, finding the centre console surround and the driver’s seat repaired, but for a car with over 200K on the clock, it’s looking good.
Once vacuumed, I take stock of the inside. It needs work if I’m going to take this car back to original, and it needs parts. A quick post on the GT Four NZ Parts page on Facebook, and I get a response from someone one suburb over who has stripped his GT Four for racing, and do I want to buy his entire interior? Does milk cost more than petrol? Hell yes, I want to buy that stuff. I’ll head over to see him during the week and see how it looks, and make a deal. He also has the air ducting that feeds the air box I’m missing so that’s another part I need crossed off the list.
On the even more positive side of things, the guy also has some door cards in good condition, and they’re definitely something I have been struggling to find. You might remember from Part 1 that someone in Japan had cut huge holes in our door cards to fit aftermarket speakers.
I’ve tracked down an original 10-speaker audio system (except for the head unit) for the GT Four, so will be installing that. The front speakers are in the lower dash, so there should be no speaker holes in the door cards, with the factory tweeters up by the door mirrors.
Project Car: 1993 Toyota Celica GT Four | Bodywork Fix
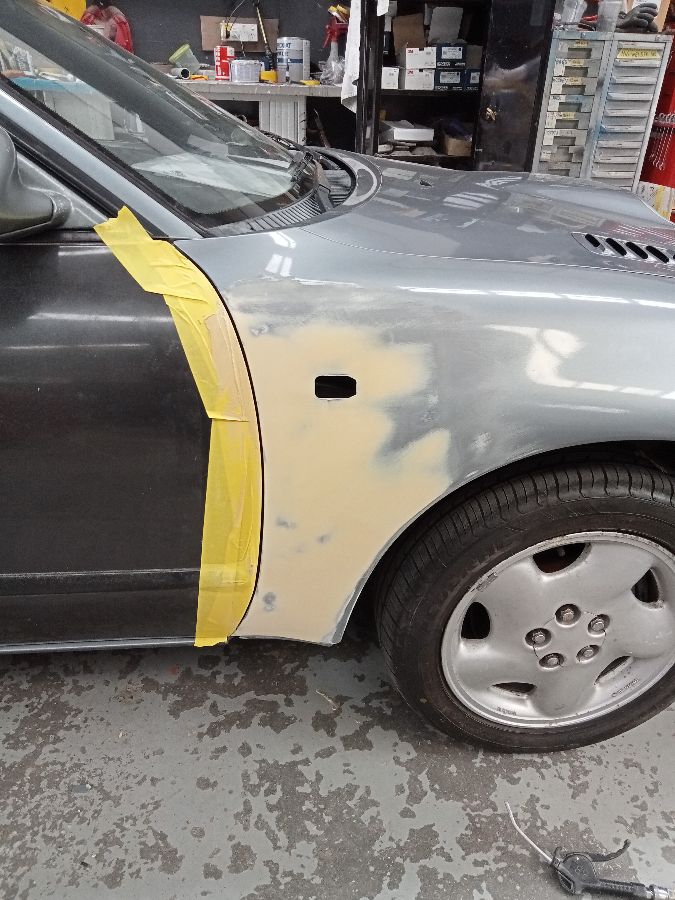
As far as I know, the main thing stopping me from taking this car for a WoF check is the driver’s door and the non-functioning speedo. As mentioned in Part 1, it got bent at the lock, and also this did some damage to the guard.
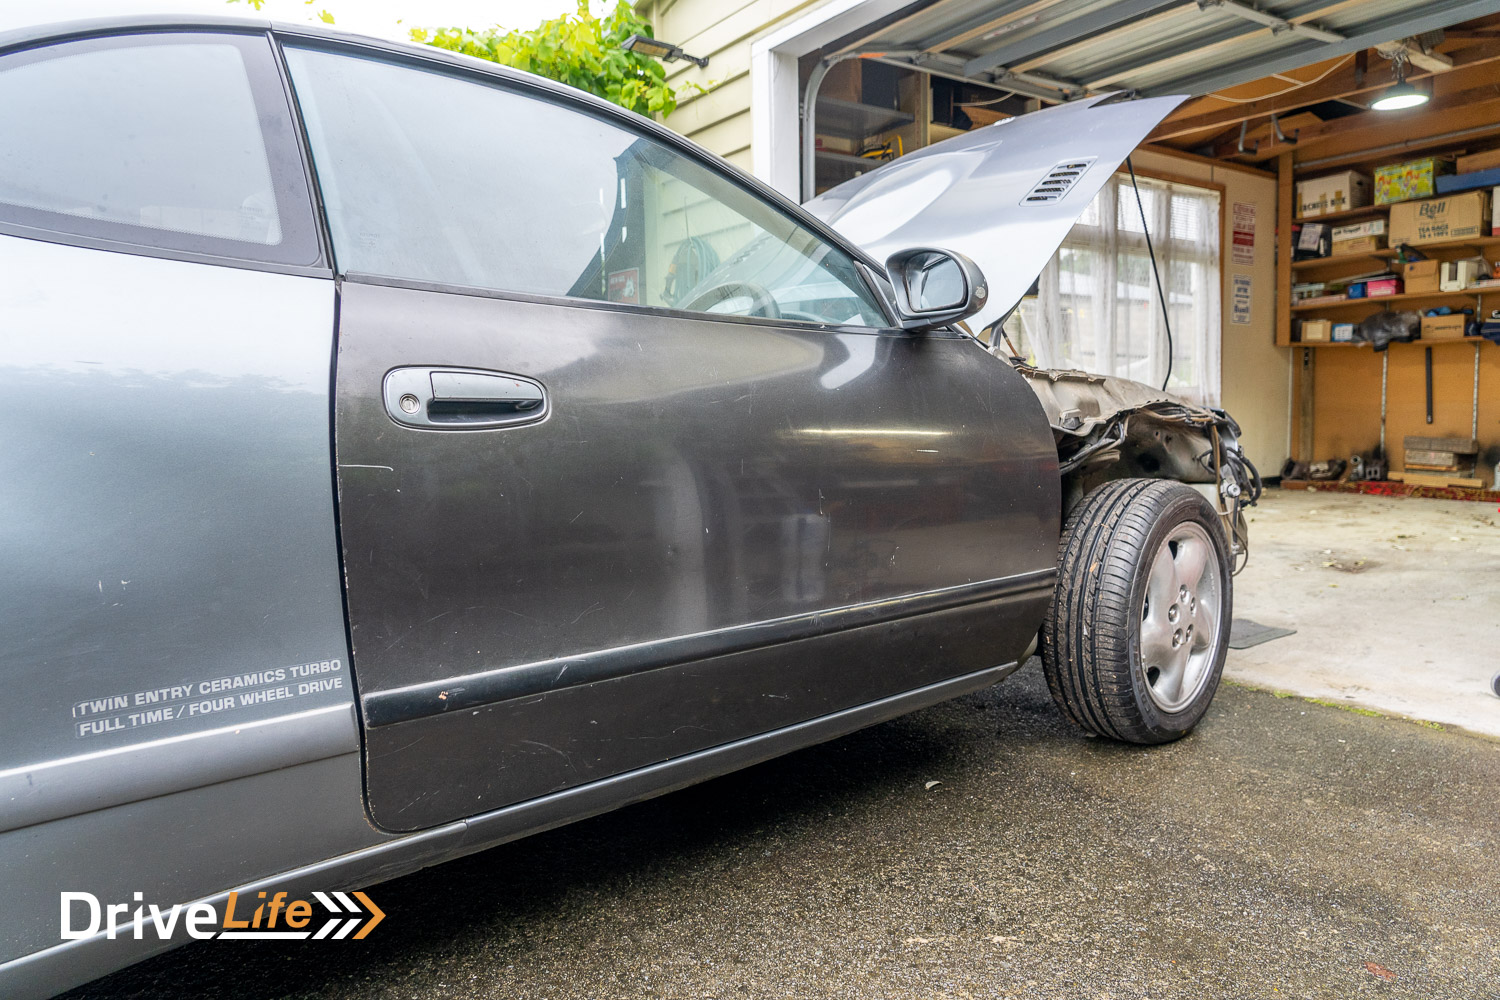
Getting a replacement door is going to be the easiest way to resolve this since we are likely going to repaint the GT Four anyway. I’ve sourced a new (used) door and will pick it up next week, but in advance of this decide to remove the driver’s door. I’ll also remove the front guard, and take a good look at it. While it was suggested that replacing the guard is going to be easiest – and no doubt it is – trying to find a widebody right-front guard for a GT Four is not easy. I did find one, but the guy wanted $850 for it. I may not be Scottish, but I just couldn’t pull the trigger on that one.
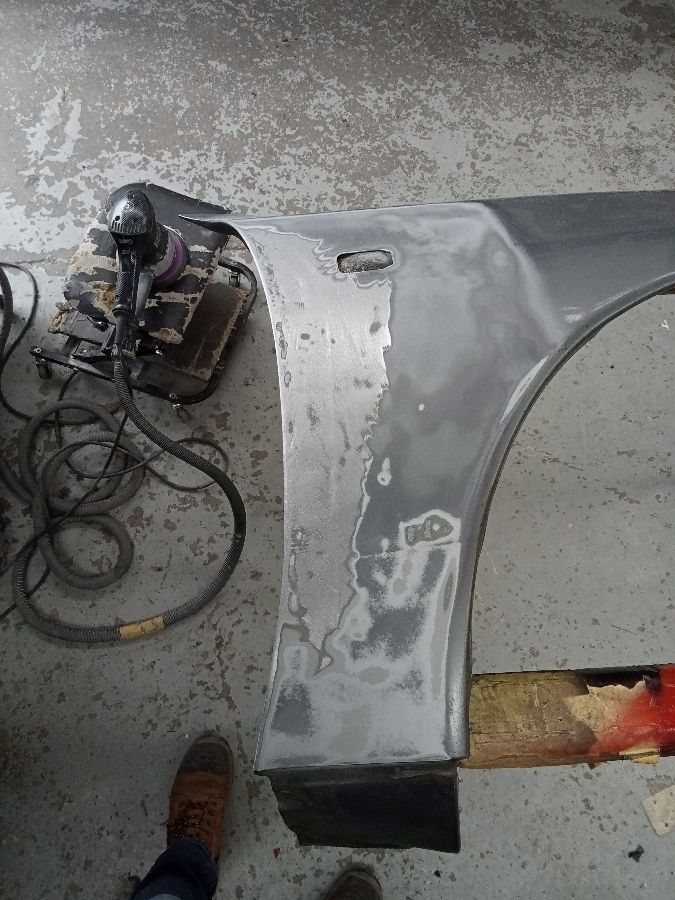
Taking off the guard means I can check out the damage to it. While I’m no panel beater, once off I’m hoping it will be a matter of dropping it to a panel beater and getting them to fix it. I’ll need to check the structure of the car too. While it looks like the GT Four guard is the only thing damaged, I need to make sure there’s nothing under it that also needs repairing.
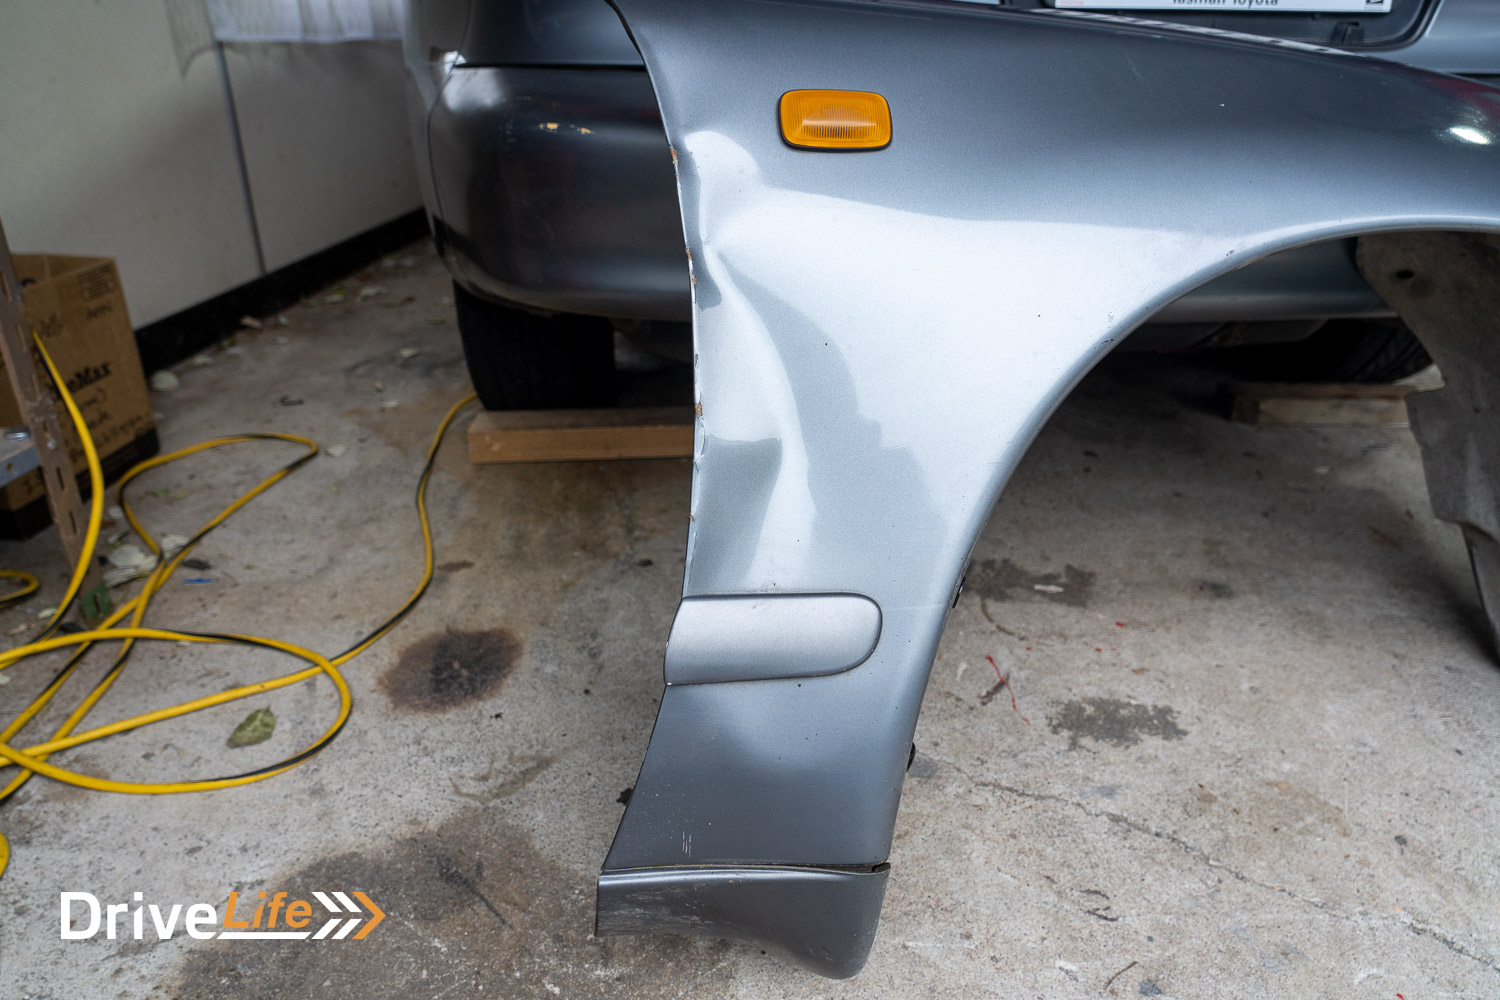
This does mean removing the front bumper and accessing bolts that are not easily accessible, but eventually, the bumper is removed and then the guard. It looks ok to my non-panel beater eyes, and after taking the guard to Edwards Panel and Paint in Lyall Bay, they confirm it’s very fixable. The car is booked in there in a few weeks, just before Christmas, to have the guard repaired and then put back on the car.
I’ve also got the new (used) door on and other than having to move my mirror over, it’s a straightforward job. In this same week, I dropped the GT Four’s factory rims off to have new tyres fitted and balanced. I hated doing this, as the Firestone Firehawk tyres on the rims have about 90% of tread left – but they were manufactured in 2009, and there’s no way I’d trust them. We’re taking the tyres back to the factory-original size of 205/50/15, a size that’s a little tricky to find.
Project Car: 1993 Toyota Celica GT Four | Speedo Time
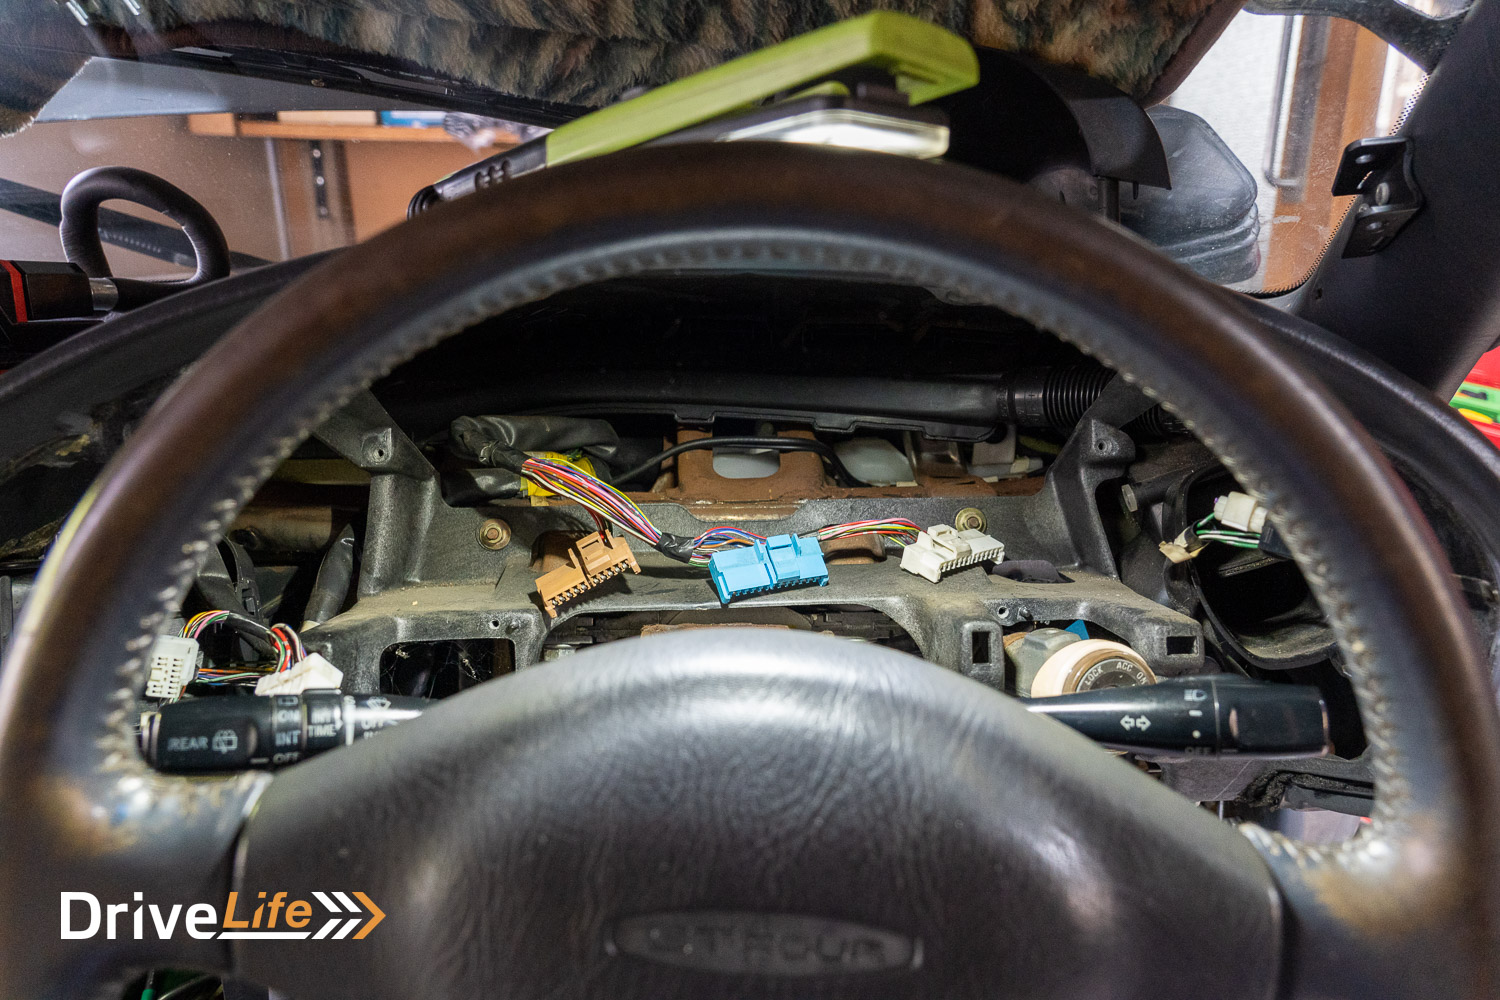
Time to see if we can get the speedo working, or at least find out what’s wrong with it. Thank God for the internet, as I download the entire wiring diagram for this model. I have no idea how we got on with things like this before the internet, other than buying a $50 Gregory’s manual.
Originally, I felt that there was a single issue with the entire dashboard, as the temp gauge etc was not working either. So that should be simple to find if it’s the whole dashboard affected. To be sure, I start the car and see the rev counter working. So that’s one thing that does work. I leave the car running, and eventually, the temperature gauge does start to come up. Okay, so maybe it is just the speedo that’s not working.
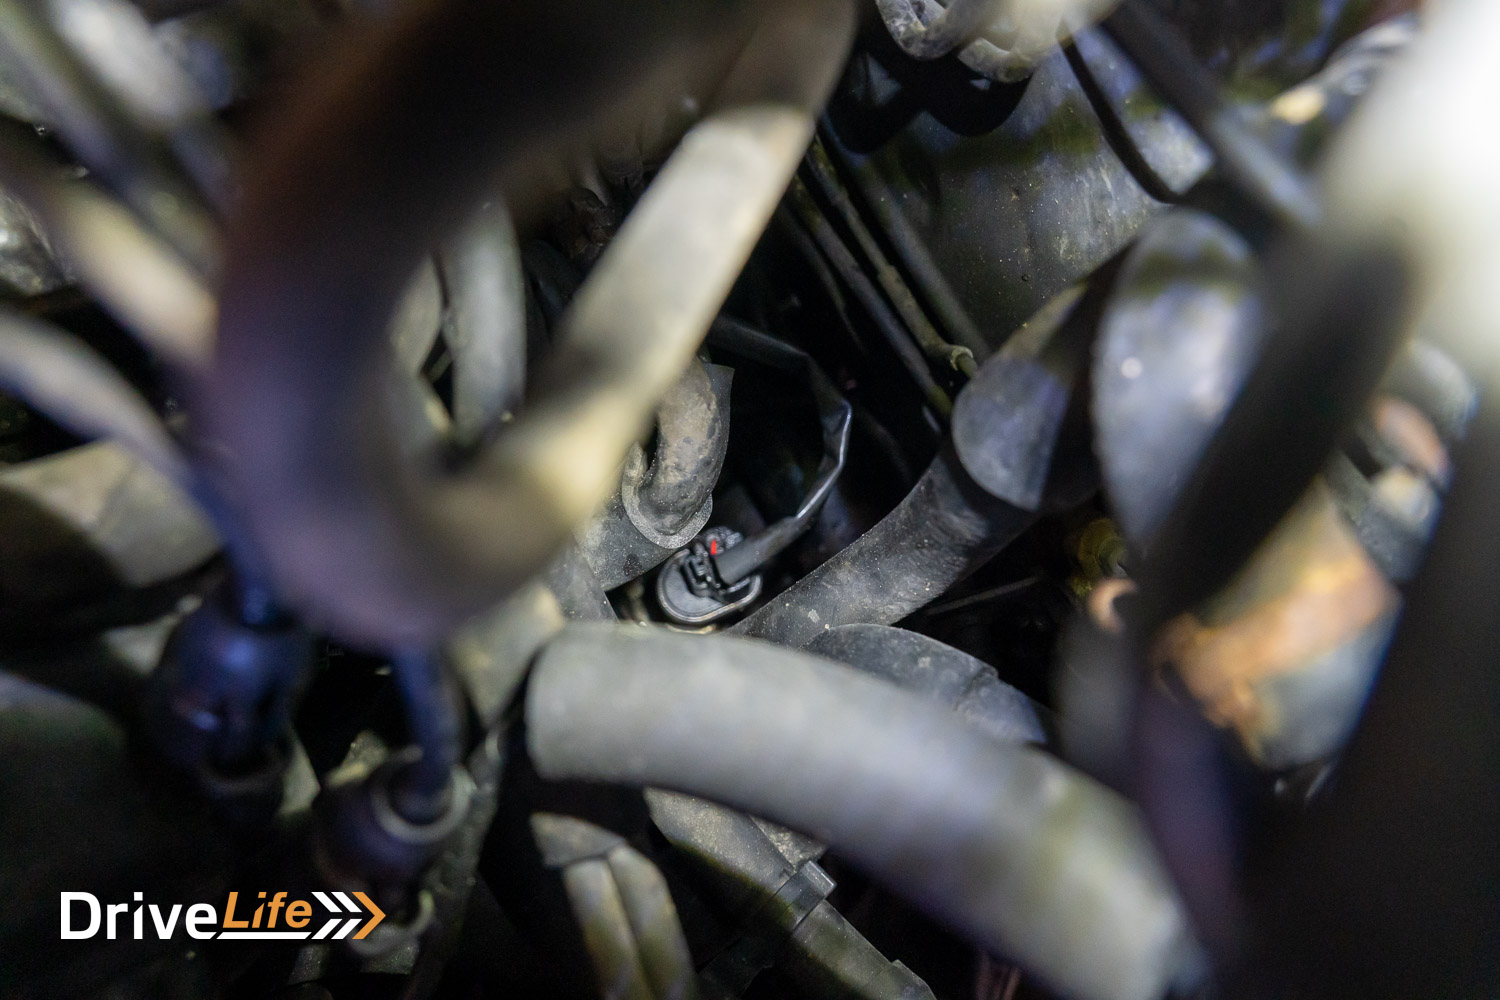
There’s a blue/white wire that goes from the ECU to junction 2 (J2), so this is a good place as any to start. I can see the wire coming out from the ECU into the loom, and then to the side is a smaller plug with one blue/white wire connected, another blue/white wire on the same side that’s been cut, and the plug is not plugged into anything. My mission today is to find where this plug’s female companion is, as surely this is the issue with the speedo.
According to the wiring diagram, J2 – which looks like the junction point I need to find – is up behind the dash somewhere. I’m sure others have done the same thing as me; just start removing stuff until you find what you are looking for. Out comes the glovebox, out comes the dash cluster, and still no sign of J2.
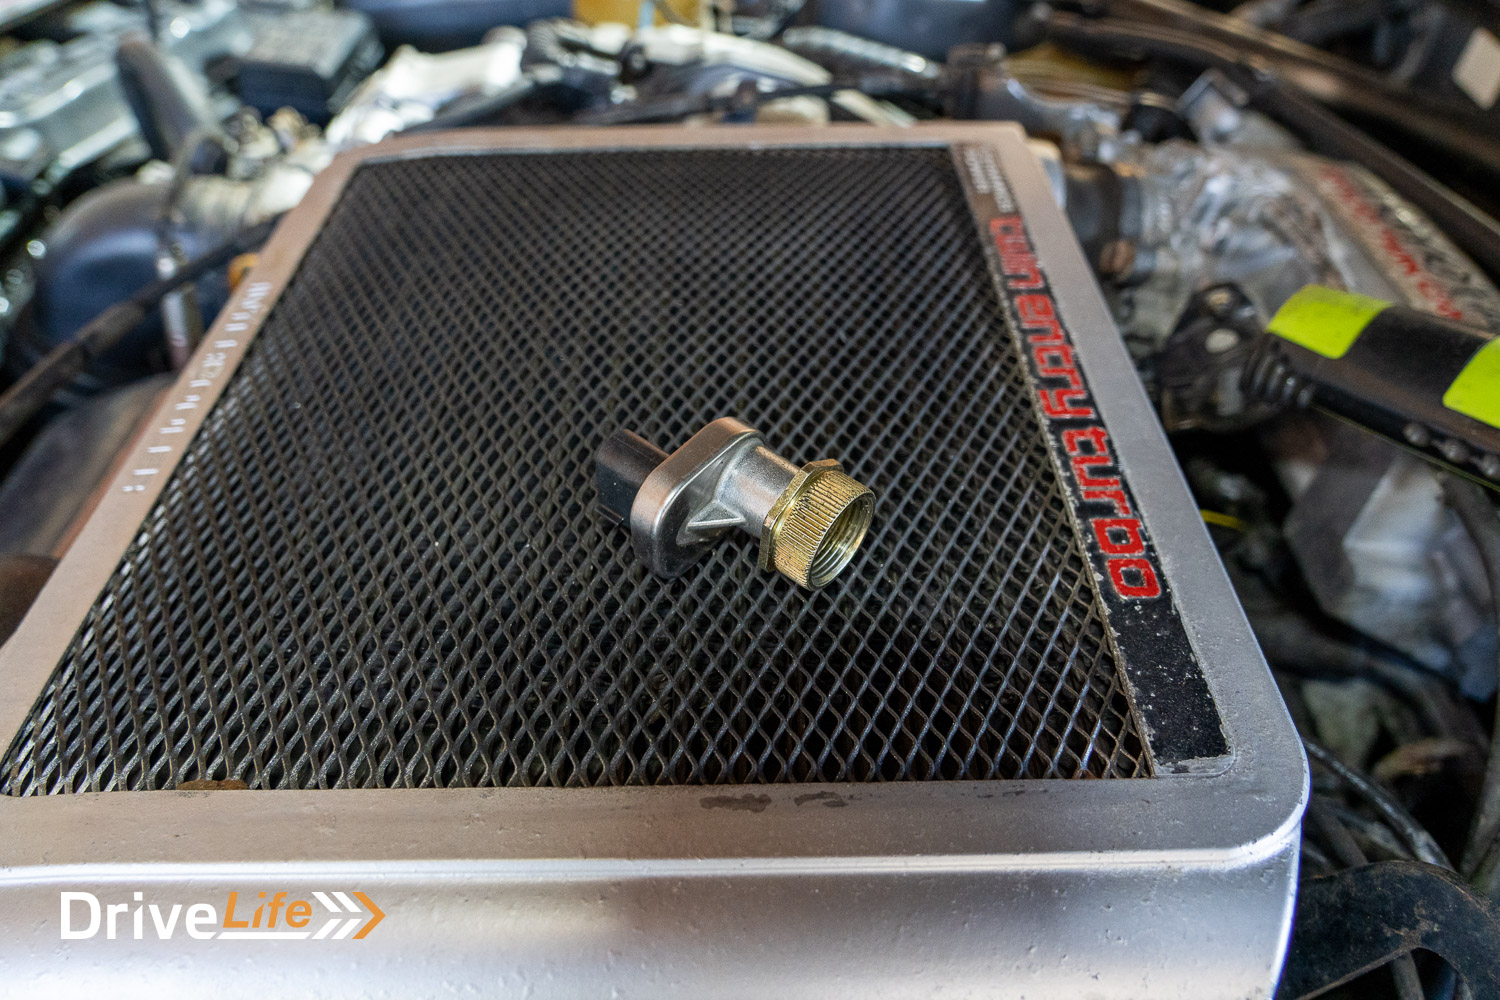
Of course, I never find J2. If you know where it is, please let me know. I feel like putting up some ‘missing’ flyers on telephone poles. Anyway, I hate to admit it but I gave up. But then, I discovered something. On my moving the car up the driveway, the speedo does go, but it’s reading very low. On my driveway, I get to 20km/h and the speedo reads 5km/h. So while it may not be a wire disconnected after all, it could be the speed sensor mounted on the top of the gearbox. I found the sensor and naturally, it’s not easy to get to. But removing it showed that it looked fairly new. It could still be the issue but I have no way of testing it. I check that it’s getting 12 volts, and it is. The earth wire is earthing it correctly so it could be the sensor or the signal wire is broken.
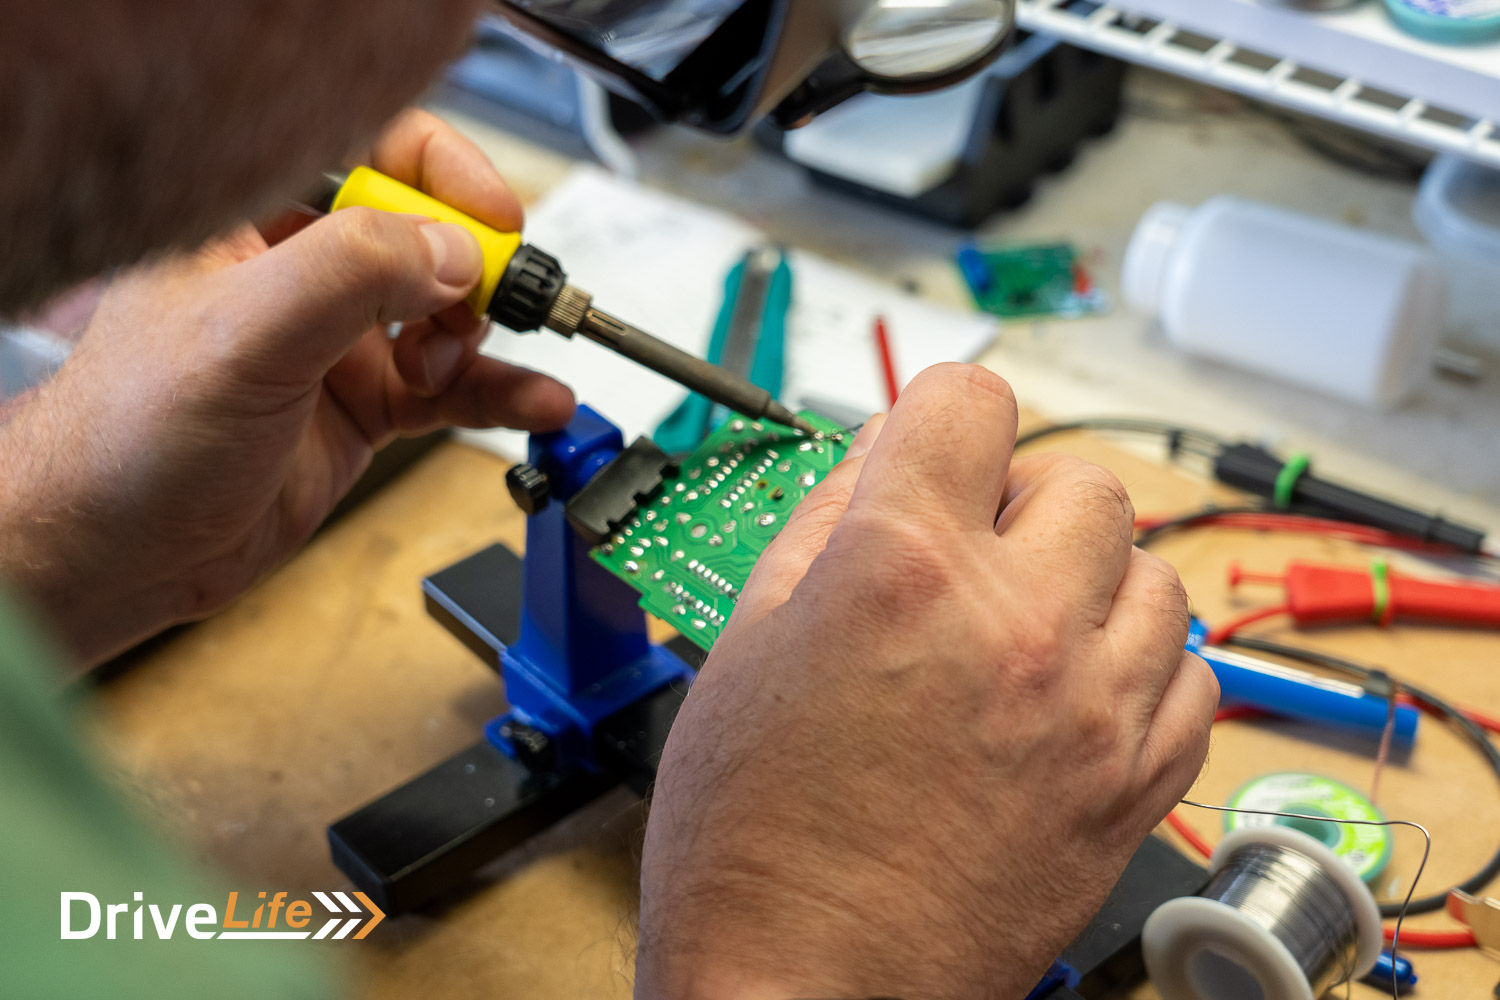
While the engine isn’t ODBII, it does have some rudimentary code-checking capability by putting a wire jumper across a couple of terminals under the bonnet. If the speed sensor is faulty, it should throw up a code. On checking, there are no error codes so it was out with the gauge cluster and I took it to a friend who builds high-end amplifiers to resolder all the joints. This hint came from a New Zealand Facebook Group for GT Fours; apparently, this is a common issue.
While there were no obvious dry joints, they were all resoldered anyway. The capacitors were checked out, and they looked fine too. So it was back home with my ‘new’ dash cluster and reinstall – but still, the speedo is not working correctly. My next plan will be to borrow a dash cluster and test it out. If a borrowed dash cluster works, then I have an absolute direction to work towards.
Project Car: 1993 Toyota Celica GT Four | Guard Repair
After taking the car to Edwards Panel and Paint, it was ready on December 23rd. With the ‘new’ door and repaired guard, it’s looking a lot better, but of course, patchy. The door is a different grey and the panel is now covered in epoxy primer. Still, who cares; 2023 should see a full repaint of the GT Four.
But only the guard has been repaired and refitted so naturally, it took over an hour to fit the inner guard properly and then a whole ten minutes to get the front bumper back on. Finally, it’s starting to look like a real car again.

Project Car: 1993 Toyota Celica GT Four | Replace Diff Mount
A new diff mount came with our car, and I could hear the diff mount clunking on speedo test drives. One weekend, it was time to get this thing replaced. I found an excellent webpage with simple directions to get it done.
With the car on axle stands and wheels off, the first bolts to get removed are the 4 holding on a crossmember. Of course, they wouldn’t budge, so it was air compressor on and rattle gun out, and that got them loose very quickly.
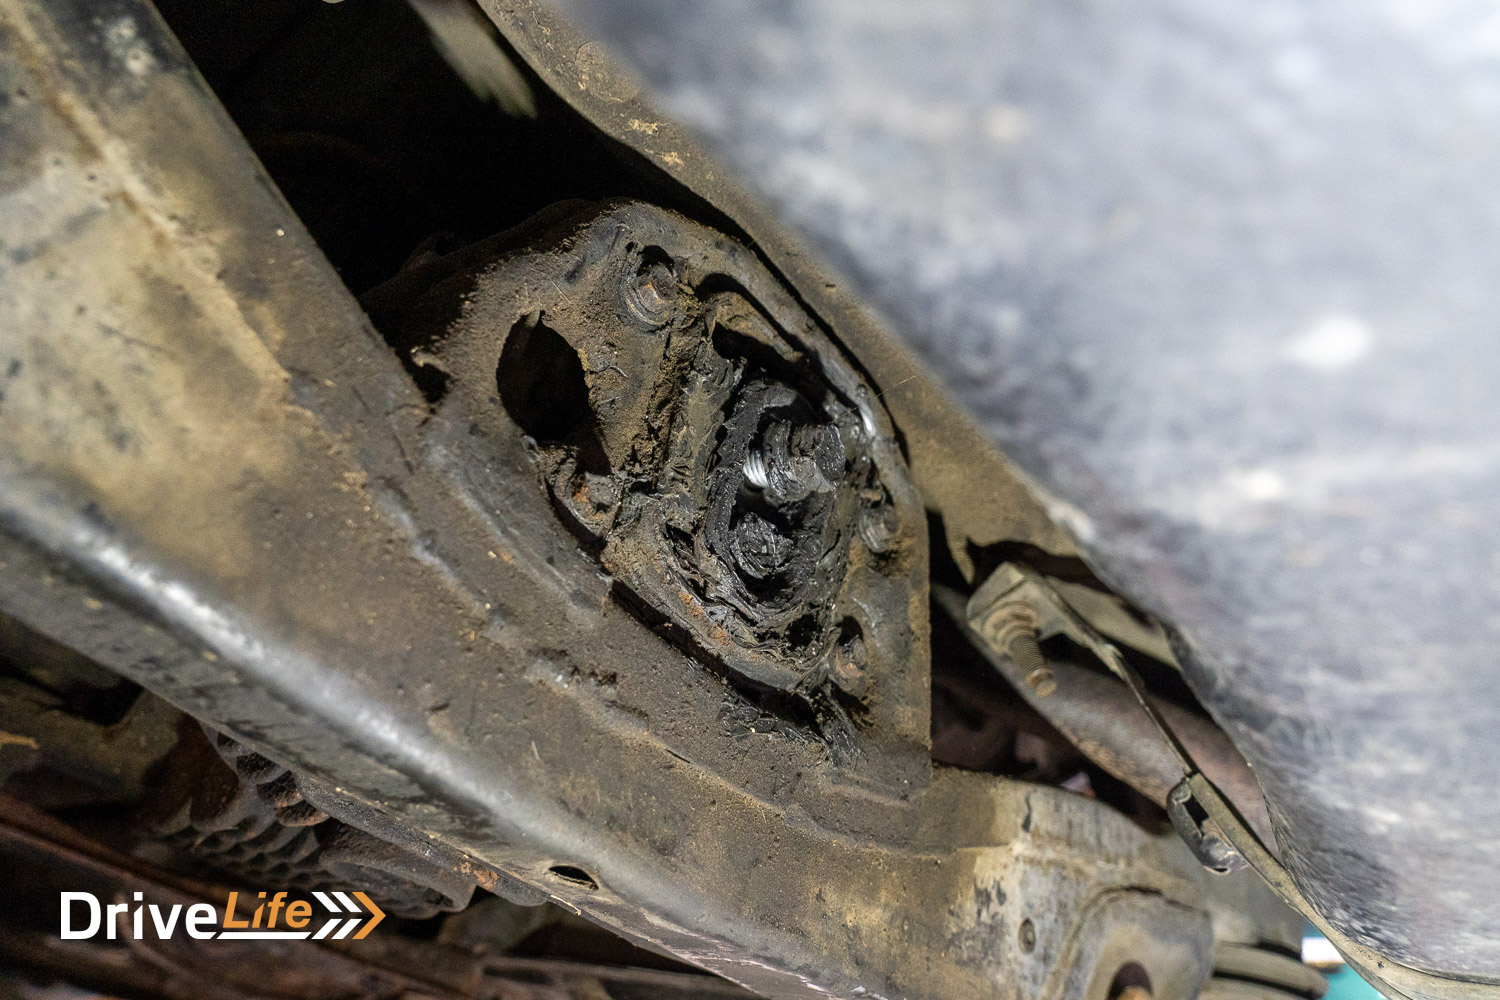
Next up were the 6 at the rear of the diff mount, and these came out easily. It was looking like a simple job until it came to removing the four 19mm bolts that hold the diff to the subframe. Rattle gun time and the first two come loose. The 4 bolts have an exposed thread that comes out above the frame so naturally, the threads have rust on them and that’s stopping them from moving in the slightest. A dousing of CRC on both threads, and one of them loosened up. This was a moment of joy until I realised there’s actually a nut on top, and it’s simply turning round and round. The other bolt won’t turn at all.
That was it for the day, another dousing with CRC and try again in the morning. I’ll try and get a ring spanner to hold the nut that’s moving, and for the other side? I have no idea. There’s so little room up there to get a spanner in to even attempt to loosen the nut, and even then, the rattle gun should work better than a spanner.
The next day I found a long power bar – one that extends an enormous amount. And that was all it took – some decent leverage. I got the remaining nuts off and got to work in replacing the mount. That only took minutes, and then another hour to put it all back together. A quick test drive around the block found fewer knocking noises from the rear. Job done, but not one I want to do ever again.

Project Car: 1993 Toyota Celica GT Four | Next Steps
I was hoping to have a WoF by now, but it’s not to be. I’m heading to Hawera next weekend to work on our other project car, the Sunbeam Rapier V8, so wil grab a dash cluster off a spare ST182 Celica to test out. It won’t be exactly the same dash as the GT Four, but for testing purposes, it doesn’t matter. I’ll be able to see if the speedo works or not, and that will give me a direction of where the issue lies.
As soon as that speedo is fixed, it’s off to VTNZ to try for a WoF, and then we can start working on everything else that needs fixing.


